Publish
This active command publishes the selected BI asset to the specified location on your landscape. This particular command publishes objects that are already published, so it creates a kind of a copy. But you can use another command to Publish Workbook from a File.
Warning
It is available for workbooks, flows, and standalone data sources only.
Select one or more workbooks, flows, or standalone publish data sources. Right click and choose Publish from the context menu.
Note
The tabcmd utility must be available and configured in your MMTE Administrator to execute this command.
Choosing Environment
First, the Publish Tableau Environment dialog window opens:
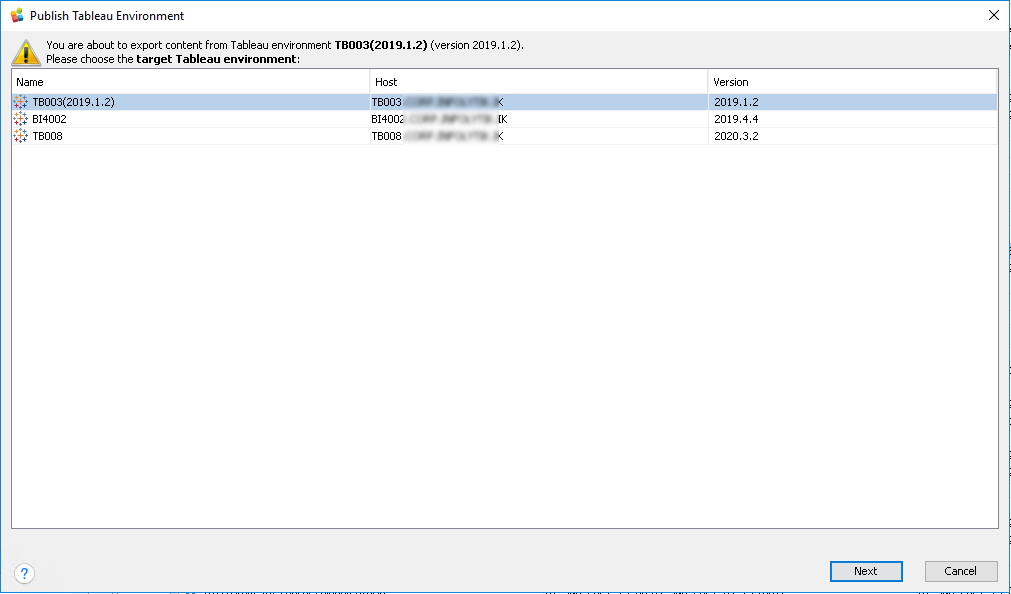
Choose the destination environment. It can be the same or different environment than a source one.
Click Next to proceed or Cancel to abort.
Choosing Site
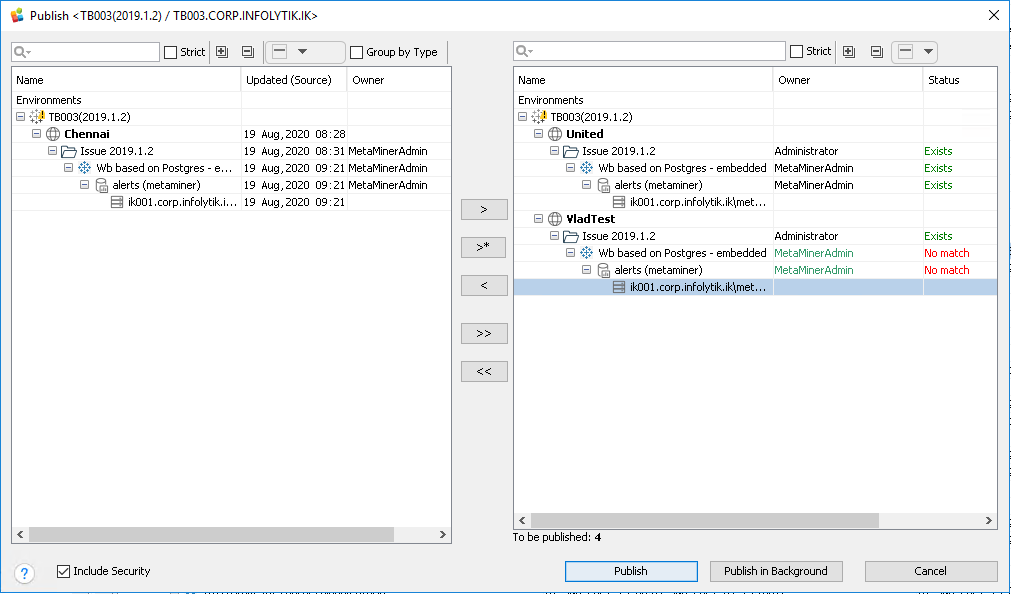
Then, the Publish <Version / Hostname> dialog window opens:
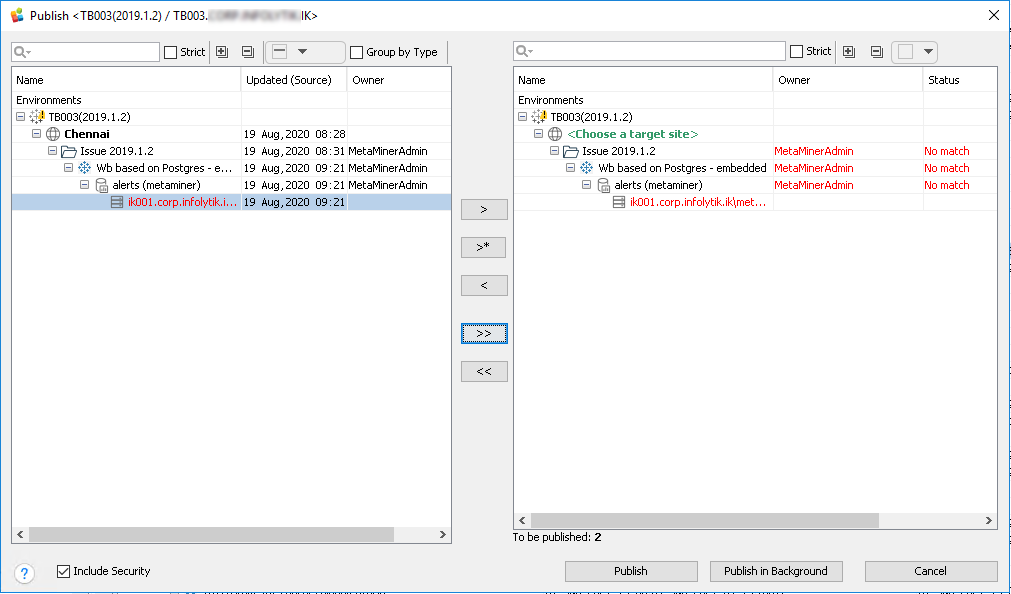
In this dialog window, specify which object(s) should be published, where, and how.
Multiple copies of a single object can be published.
In general, the dialog window consists of two areas:
- Left area displays selected (source) BI assets
- Right area displays where they should be published (destination)
Each area includes a Quick Search Control and Expand/Collapse tool for quick global selection, especially useful when you operate massive sets of objects.
Those tools also allow you to
- Select projects
- Select project contents (inner items inside projects)
- Select published data sources (Standalone Publish DS will be selected, if any)
- Select workbooks
- Select flows
The following commands are available for linking source and destination areas:
| Command | Description |
|---|---|
Include the selected source object(s) to the destination area. When clicked, opens the Choose site for <OBJECT> dialog box: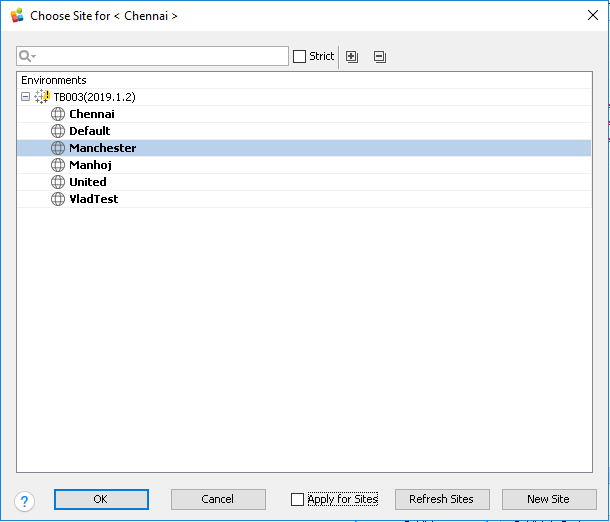 Choose the destination site from the list of available existing sites, or click New Site to create a new site, or click Refresh Sites if the list is updated on the server. Set the Apply for Sites to apply the same choice for the rest of the selected source objects. If the source object was previously included, the old choice stays untouched, and a new copy is added. |
|
| Performs the same action as a simple include, but in addition affects the nested objects ("children") below the selected source ones. | |
| Exclude the selected destination object(s) from publication. | |
| Include all the source objects to the destination area. It works with the same logic as a simple include. | |
| Exclude all the destination objects from publication. |
Fixing Errors
If destination sites are not specified for all source objects, they are displayed as green
If any connection to the destination is broken, it is displayed as a
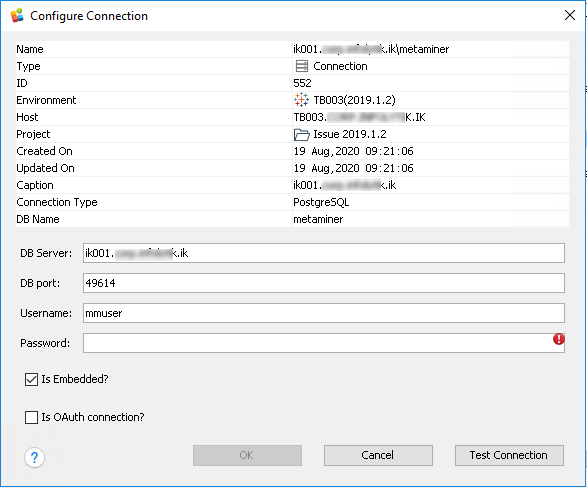
Specify the following settings:
| Setting | Type | Default | Description |
|---|---|---|---|
| DB Server | String | localhost | Hostname/FQDN or IP address of the server where RDBMS is installed, e. g. myserver.company.org, 76.178.95.192, localhost |
| DB port | Positive Integer | 49614 for embedded, 8060 for Tableau PostgreSQL, 5432 for standard psql | TCP/IP port on which RDBMS is listening |
| Username | String | mmuser | The database user account to be used by MMTE Server for accessing data source |
| Password | String | mmuser | The password of this user account |
| Is Embedded? | Checkbox/Boolean | True | Set this checkbox if you want this data source to be embedded. In this case the server will cache your credentials, and it will not be necessary to specify them again for connecting to this data source. Otherwise, login/password will be necessary each time. |
| Is OAuth Connection? | Checkbox/Boolean | False | Set this checkbox for OAuth authorization. Settings for OAuth (provider etc.) must be previously configured in Tableau. In this case, no password is required, the value of the Username attribute is an OAuth username, and the value of Is embedded? specifies whether to embed the OAuth credential with the data source. For further details, please see official Tableau documentation |
When finished with settings, click Test Connection. Proceed if the Success alert appears and return to editing settings otherwise.
Click OK to save the edited connection settings or Cancel to abort.
When all errors are fixed, the Publish <Version / Hostname> looks like the following example:
Running
There are the following controls available under the source/destination areas:
| Control | Description |
|---|---|
| Include Security | Set this checkbox to copy user permissions from source objects to destination. Uncheck it to keep the default security settings of the destination sites. |
| Publish | Click this button to start publication as a foreground process. |
| Publish in Background | Click this button to start publication as a background process. |
| Cancel | Click to abort. |
When Publish is clicked, the Publish <Version / Hostname> dialog window closes and Checking involved Users And Groups pop-up opens:
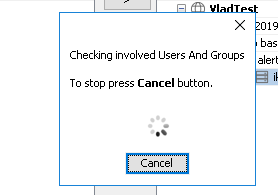
Wait while MMTE is checking them. Then, the Publishing... pop-up opens:
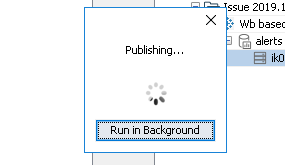
You may want to click Run in Background to close this pop-up and get back to MMTE Client UI, the publishing process will continue in background.